how to quilt

My Photo
Name:
Location: Southern California, United States

Sunday, August 20, 2006

Signing and Dating Quilts


How often have you admired a quilt and wondered who made it and when it was made? If you’re anything like me, frequently once I sew the last stitch of binding on the quilt, I declare it complete – without a name label.

Now that I have a collection of many quilts, when I made them has become a blur that I wish were different. And I remember all of the quilts I have given away with no identifying mark.

You can prevent that by signing and dating your quilt. Fabric markers make it a simple and quick. Or you can create a label and stitch it onto your quilt. Get creative with your quilt label – you’ve spent hours creating your heirloom, allow future generations to appreciate your work by name.

Here are some tips for marking your quilts:

a) Include your complete name – first, last and maiden name. Tracing quilts through families becomes easier if all names are included.

b) If your quilt was a community project, include the names of everyone who participated.

c) Record the entire date when the quilt was completed – month, day and year.

d) Add information about events surrounding the quilt will give the quilt a sustaining history – the birth of a baby (specifically named in the label), marriage of a couple (named in the label), a son or daughter going off to school…..you get the idea.

e) Specify where the quilt was made – city and country.

Happy Quilting!

Penny Halgren
www.how-to-quilt.com

Penny is a quilter of more than 24 years who seeks to interest new quilters and provide them with the resources necessary to create beautiful quilts.

This article courtesy of http://www.How-To-Quilt.com. You may freely reprint this article on your website or in your newsletter provided this courtesy notice and the author name and URL remain intact.

Sunday, August 06, 2006


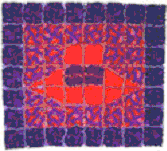
Fun and Easy Rag Quilting

The first time I heard the term “Rag Quilting,” I though it had something to do with using big, long rags of fabric and somehow weaving them together to make a quilt.

Boy, was I wrong!

It turns out that rag quilting got its name from the ragged edges on the quilt. No doubt in my mind that this quilt design was created by a quilter as a variation of a Quilt as You Go kind of pattern – whether it was intentional or accidental is something only that quilter knows.

Wide seam allowances are common for rag quilting – usually at least 1.” So, if you would like each block to be an 8” square when finished, you should cut 10” squares of fabric and 7¾” batting or flannel.

To make a rag quilt, you take 2 squares of fabric (could be triangles or any other shape, but squares are most common), and a piece of batting for each block in your quilt. You could use a piece of flannel instead. The batting or flannel should be cut about 1¼” smaller than the squares of fabric.

Place one square of fabric right side down on your table. Place the piece of batting or flannel in the center of the fabric. And then place the other piece of fabric right side up on top of the batting. You now have a stack with 3 layers, and the right sides of the fabric are facing out.

Stitch through all of the layers, to secure them in place. Usually these squares are machine stitched, using a simple straight stitch, making an X through the square. To do that, you begin in one corner and stitch to the opposite corner. Take your square out of the machine, and repeat the process on the other corner. You could do some fancy quilting in each block if you would like.

Continue this layering and stitching for as many squares as you would like – depending on how large you would like your quilt to be.

Once you have all of your squares/blocks stitched, it is time to begin to sew them together to make your quilt.

The process is the similar as if you were sewing blocks together to make a quilt top, with just a slight twist or two. Take two blocks and place them WRONG sides together. Stitch them together using a 1” seam allowance. Sew the seam along the entire edge of the fabric, and do not backstitch.

Sew the blocks in each row together. Now you have a bunch of rows of blocks with all of the seam allowances facing to one side (usually the front side).

Once that is done, open the seam allowances, and sew the rows together, continuing to place the WRONG sides of the fabric together, so your seam allowances will face the top (right side) of the quilt.

After all of your blocks are sewn together, clip the seam allowances – that is what makes the “ragged” edge, or fringe. Take a very sharp pair of scissors and cut about ½” into the seam allowance, making sure not to cut into the stitching. Make these slices about ¼” apart from each other. These slices are from the edge of the fabric toward the stitching that holds the seams together.

Once all of the seams are clipped, shake your quilt out to remove as many of the loose threads as possible, then wash the quilt and place it in the dryer. This will cause the clipped seam allowances to fringe even more.

And, now you’re done!

Find a complete Guide for making a Rag Quilt in a Weekend!

Happy Quilting!

Penny Halgren


Penny is a quilter of more than 24 years who seeks to interest new quilters and provide them with the resources necessary to create beautiful quilts.

www.How-to-Quilt.com
Inspiration and Education for Beginning Quilters

www.Rag-Quilt-Instructions.com
Fast, Fun and Funky Quilts

www.Fabric-Postcards.com
Quilt Greetings Across the Miles


This article courtesy of http://www.How-to-Quilt.com. You may freely reprint this article on your website or in your newsletter provided this courtesy notice and the author name and URL remain intact.
©2006, Penny Halgren

Friday, August 04, 2006

Greetings, Quilters-

Baby quilts are quite fun to make, especially when you start with already-quilted fabric!

It seemed like all of my friends were having babies around the same time I was. Not really too much of a coincidence, since we were all about the same age, and got married about the same time.

So, with one baby myself, and having completed a couple of quilts already, I understood the pleasure of having a baby quilt, and also understood the meaning of using a baby quilt.

First, it is a truly amazing thing to think that someone loves you enough to spend hours and hours creating a special gift for a new baby. Especially knowing what babies do - throw up, pee, chew, and roll around. And they don't seem to care what they do it on or to.

That's where the understanding of how babies use a quilt helps determine the design. It also helps to know whether the mom will appreciate the quilt and use it carefully, or whether she will use it the same way as a blanket purchased at Walmart.

Of course, babies need blankets, and quilters love to make quilts. So why not make a quilt that a baby can use, throw up on, pee on, chew on, and roll around on?

One of my dear friends was having a baby, and I wasn't sure about how she would use the quilt, so I scouted possibilities at the local fabric shop. I discovered fabrics that were already quilted. Solid fabrics in nice colors. So, I purchased a baby yellow quilted fabric, and found some big pictures to use as templates for an applique design on the quilt. I'm sure the options are much wider today.

This was a very simple design - a kitty sniffing a ladybug that was resting on a flower plant's leaf, and a sun up in the sky.

I pressed fusible interfacing to each of the pieces to make my sewing easier, and in a quick few hours, the project was complete.

Applique looks pretty easy, and it really is. There are a couple of things to keep in mind that will make yours easy and look great once completed:
Plan your design carefully and cut out all of the fabric pieces before you start sewing. For the best finished design, your pieces should overlap each other. The first applique I made, I tried to have the pieces just meet. That was a huge mistake! They never match up exactly, and I ended up with frayed edges and a mess.


I iron a very light weight fusible interfacingto the back of my fabric pieces. Then I draw the pattern on the fabric and cut it out. You could use a double sided fusible interfacing. This will help keep the pieces in place as you sew. It may cause the finished quilt to be a little stiffer - something to check out.


Lay out the pieces on your background fabric as you want them in your finished design. Do not iron them in place at this time.


Lightly draw an outline of the finished design on your background fabric. This will serve as a guide as you are sewing the individual pieces.

Remove the pieces from the background fabric and place them in an independent resting place. This could be an ironing board, table, or pile in your sewing area. I like to have mine organized like they will be sewn, so it is easier for me to see what the next piece is.

Find the bottom-most piece. This will be the first piece you sew. In the quilt above, for the cat, the bottom-most piece was his tail.

Once found and placed on your background fabric, sew it on.

Tip #1 - this is where the outline on your background fabric will come in handy.

Tip #2 - I use thread that matches the fabric I am sewing on the top for my applique. The bobbin thread stays the same color, and matches the bottom fabric.

Tip #3 - I adjust the tension on my machine so that most of the top thread goes around to the back and the bobbin thread is almost a straight thread running throuh a tunnel of top thread.

Tip #4 - I use something stiff under my background fabric to allow the fabric to slide through the machine without getting guided by the feed dogs. Long ago, I used plain paper, and that still works. There is also a woven material, much like a non-fusible interfacing, that you can use. One piece that is the size of the whole design seems to work the best.


Identify the next lowest piece, and place it on top of the piece just sewn. Sew this piece in place. If this fabric is a different color from the previous one, you may wish to change your top thread.


Continue stacking and sewing until your design is finished.

If you have used paper on the back of your design, now is the time to rip it out.

You're done!


Once I had all of the design pieces sewn on and the paper ripped out, I put a quick binding on. This binding was a store-bought double wide bias binding, that was made for quilts. It is about 1" on each side - so it is really extra wide. I machine stitched the binding on the front, folded it over to the back, and then hand stitched it closed on the back. After all, I did want something about this baby quilt to be hand stitched.

My friend, Roberta, loved her new baby quilt, and her baby, Hilary enjoyed it as well. What's really fun about this quilt is that Roberta had never really thought about making quilts. With this gift and the passage of some time, she, too, decided to take up quilting. Now not only do we share stories of our kids, but we share stories of our quilts!

You just never know where your passion for quilting will take you and / or your friends.

Happy Quilting!
Penny Halgren
www.How-to-Quilt.com
Inspiration and Education for Beginning Quilters

www.Rag-Quilt-Instructions.com
Fast, Fun and Funky Quilts

©2006, Penny Halgren
Penny is a quilter of more than 24 years who seeks to interest new quilters and provide them with the resources they need to create beautiful quilts.

This article courtesy of http://www.How-to-Quilt.com.
You may freely reprint this article on your website or in your newsletter provided this courtesy notice and the author name and URL remain intact.

Are you part of the New Generation who is unleashing their artistic potential by learning how to make a quilt?


Did you know that there are more than 21 million quilters in the United States? And that was as of the end of 2003! With a 50% increase in the number of people learning how to quilt between 1997 and 2003, I can only imagine how many quilters there are today.

And quilting has spread to countries far beyond the United States. A quick view online and in quilting magazines shows that making quilts has taken a strong hold in England, Australia, New Zealand, and Japan, as well as many Scandinavian countries.

To people who already quilt or who enjoy quilts that others make, it is not too much of a mystery why quilting is spreading popularity. For many it is an easy expression of artistic talent. If you are like I am, and are presented with limited drawing and painting talent (!), quilting is a fantastic way to create a work of art with fabric. It is well understood that the “painting” will not be perfect, and that colors and patterns are limited to what’s available or what can be hand dyed.

Using existing quilt block patterns, the creation is in the selection of fabric and color, and then the placement of those fabrics within the pattern of the block. Beyond that, placement of the blocks in their color variation within each quilt further creates the art.

For example, a nine patch pattern, where there are simply nine squares in each block, can change from a baby quilt to a scrap quilt just by the selection of the colors of fabric used. Using periwinkle blue and cotton candy pink creates a soft, baby-like look. While brick red and midnight blue would appeal more to a guy.

Happy Quilting!

Penny Halgren
www.How-to-Quilt.com
Inspiration and Education for Beginning Quilters

www.Rag-Quilt-Instructions.com
Fast, Fun and Funky Quilts

This article courtesy of http://www.How-to-Quilt.com.You may freely reprint this article on your website or in your newsletter provided this courtesy notice and the author name and URL remain intact.
Tuesday, August 01, 2006

A Group Quilt


Is art disappearing in our schools?

It might be, but it doesn’t need to be that way.

Even in the late ‘80s when my kids were in elementary school (the 1980s, that is!), there was concern about art being cut so that kids could spend more time learning how to read.

We all agree that reading is critical. But why did art go on the chopping block?

Many of the parents at our elementary school asked that very question. The conversation began innocently enough – a few of us began talking over a quilt. Then we asked at PTA. We asked at our District Advisory Council. Finally, we asked at School Site Council.

Everywhere we went, we got some goofy educator answer designed to confuse us. We weren’t buyin’. We knew that art was important to our children, and we wanted art in their classrooms.

About the same time, Nancy was having the same conversation with herself; and, maybe with her husband. Nancy was a teacher. A reading teacher. And she loved art, too. She was also distressed at the lack of art in classrooms, and was determined to figure out a way to bring it back.

It seemed as if one way would be to combine art with reading. Nancy spent an entire summer creating that exact program. At the beginning of one school year, she proposed a trial run in a few classes at our school.

Fortunately the principal thought it was a fabulous idea. She scraped together enough to pay for Nancy to come into half of the classrooms once a week for ½ hour for part of the year. Not a lot, but it was a start.

The Perfect Blend


The first day Nancy stepped onto our campus, it was almost as if Mary Poppins herself had arrived! Nancy arrived with a pack of books and art materials. First she read a book to the class, and then she pulled out her art supplies. Colored paper, scissors, glue, crayons. Within minutes of Nancy’s instructions, paper was flying, glue was sticking, kids were laughing, art was happening, and we knew our kids were in creative hands.

Her book about the fall leaves and her construction paper activity that allowed our children in Southern California to make their own fall leaves was a hit.

Each month, Nancy picked a theme. Each class in the school had their story time followed with a hands-on art time. The reading was instructional, and the projects were wonderful. And there was magic in seeing children become interested in books, art, and happenings beyond our little berg of La Mesa.

I remember when my daughter, Stephanie, came home with a little skeleton, bubbling with a story about the Day of the Dead. It was all news to me. First time I had heard of the holiday, and fourth grade Stephanie was so pleased with herself to be able to teach me something.

One year, Nancy decided to have a theme for the entire year. The first year it was lighthouses. Each month, she found books about some unique aspect of lighthouses. She was even able to teach some geography, showing the kids where particular lighthouses were located. Even after 9 months of lighthouses, the kids were begging for more.

One year, Nancy did barns. Now, that was really interesting for kids from Southern California, some of whom had barely seen a picture of a barn, let alone experience all of the wonderfulness of a barn.

And Then, A Year About Quilts!

So, it wasn’t all that surprising when Nancy announced to some of us moms that she was planning to do a year about quilts. Imagine. Quilts. One entire year about quilts. By now, her program had expanded to all classes at our school, plus two more schools. And we were excited to think of so many children learning about quilts.

There are plenty of books about quilts to read to children at all ages. Stories about quilters making quilts for their families; tales of children watching their aging grandmother start a quilt, then having the granddaughter finish it.

There’s a story about a little girl who finds a quilt in her attic and has her mother repair it. A generation later, her daughter finds the quilt in their attic. The cycle continued. And, of course, Underground Railroad quilt stories. Lots of stories about quilts, lessons about history, and plenty of artwork around quilts.

But Nancy didn't have a quilt. She wasn’t a quilter, and nobody in her family was a quilter. It seemed a shame for her to have only pictures of quilts to share with her children all around the school district. And none of us wanted to just loan her a quilt. So, a group of us decided to make a quilt and give it to her at the beginning of the school year.

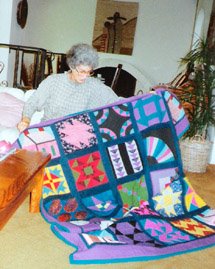
A Group Quilt in progress.

Taking the book Eight Hands Round, we decided to make a quilt using blocks that were in the book. There were 12 of us, including the 10 year old Stephanie, who got together to make this beautiful quilt. We each picked a favorite block from the book, decided on a size for the block, and committed to having our blocks done by a specific date.

We had some quilting bee-type parties to keep motivated in getting the blocks finished, sewing the quilt top together, and finally hand quilting the quilt. There were many midnight oil lanterns burned out during those months. The quilt was passed from quilter to quilter for the hand quilting, and at the beginning of the school year, the quilt was done!

Now, what was the best way to give Nancy the quilt?

One of the quilters was the school librarian, and a good friend of Nancy’s. Bea offered to have Nancy over to her house for some afternoon tea (a regular event for the two of them), and have us hiding in the kitchen when she arrived. The plot was hatched, the invitations sent, and the day arrived. There we were – twelve tired quilters, one finished quilt, and a shocked Nancy.

A Successful Group Quilt

Looking back, I think we were very lucky. Everyone did their part, the blocks were relatively the same size, and we really weren’t that organized. Still there were problems. Many times, I wished that it had been more organized and we had been able to anticipate some of the problems, let alone have ready-made solutions for them.

Happy Quilting!

Penny Halgren
www.How-to-Quilt.com
Inspiration and Education for Beginning Quilters

www.Rag-Quilt-Instructions.com
Fast, Fun and Funky Quilts